Saturday, October 8, 2022

Another new pattern release - Spider Web mosaic afghan

Spider web overlay mosaic crochet pattern now available

 I've been scrambling like crazy trying to get the last parts of this pattern put together so I could release it in time to make it for Halloween. So without further ado, my Spider Web Mosaic afghan pattern is now available. You can find it in my Etsy shop here. The design of this blanket was based on a spiderweb graphghan pattern my daughter Kaitlyn made for my Etsy shop a couple years ago. The solid web on top of the striped background creates almost a 3D effect when you look at it from further away.

Spiderweb mosaic pattern now available

This pattern is designed to be worked in overlay mosaic crochet and is appropriate for an advanced beginner and beyond. The finished size is approximately 59x69" including the border and uses worsted weight or category 4 yarn. (You can certainly use a different size yarn, including dk/category 3 yarn with an appropriate hook for the yarn. The finished size and amount of yarn used will just be a bit different.) The pattern file includes yarn and hook information, a charted graph marked with Xs on both one page for tablets and phones and split on several pages for printing, written instructions, border instructions, and some basic mosaic crochet information.

Spider Web Mosaic Crochet afghan pattern can be purchased here.

Spider web mosaic crochet blanket


Thursday, October 6, 2022

New Pattern Release - Baby Elephant for Overlay Mosaic Crochet

Baby elephant overlay mosaic crochet pattern now available

 By popular demand the overlay mosaic crochet version of my popular baby elephant graphghan pattern is now available! You can find the pattern in my Etsy shop here.

This pattern was designed to be worked in overlay mosaic crochet and with a finished size of about 33x33", it would make a perfect baby shower gift. It was designed for an adventurous beginner or intermediate level crocheter, although someone with more advanced crochet skills would appreciate an easier pattern.

The pattern includes a charted graph marked with Xs for the double crochet stitches, written instructions, yarn information, border instructions, and basic overlay mosaic crochet information.

Baby elephant overlay mosaic crochet pattern now available on Etsy

Baby elephant overlay mosaic crochet pattern now available

Click here to purchase your copy of the baby elephant overlay mosaic crochet pattern.


Monday, October 3, 2022

Envelope Border aka Double Border - Slip Stitch Start Method

 One thing I really like about working overlay mosaic crochet is that although there are a lot of yarn ends because you're cutting at the end of each row, none of those ends needs to be sewn in if you add an envelope border, which is also commonly known as a double border. The yarn ends all get enclosed between the layers of the border. I actually prefer a different method of starting the border now, but the slip stitch method is how I learned when I first started overlay mosaic crochet. Some people still prefer this method since it adds a nice structure to the edge of the project. I'll make a separate post for the other method.

Completed envelope border shown on a buffalo plaid overlay mosaic crochet blanket

As the name suggests, we'll start the border with a round of slip stitch around the entire project. The slip stitch round will be used to attach both the front and the back of the border. With color B slip stitch around. On the sides this will be in the space between the border stitch and the main pattern. Work a slip stitch in each row. On the bottom this will be between the foundation row and row 1. On the top this will be between the top two rows. (See pictures below.)

Slip stitch placement on sides of project

Slip stitch placement on the top and bottom

Turn project over so the back side is facing you.

Round 1: With color B join with a standing single crochet in the 1st slip stitch of any side. (See pictures) Single crochet in each remaining slip stitch on this side. Ch 2 to create corner. *Single crochet in each slip stitch across side, chain 2 to create corner **, repeat from * to ** twice more, slip stitch to 1st single crochet to join.

Start border with a standing single crochet in the first slip stitch of any side with the back of the project facing you.

Single crochet into each slip stitch across the sides

Round 1 complete

Round 2: Chain 1, single crochet back loop only in same stitch as join, single crochet back loop only in each single crochet across. Single crochet in 1st chain of corner (in the actual chain, not the chain space – see picture). Chain 2 to create corner. * Single crochet in next chain (in the actual chain, not the chain space – see picture). Single crochet back loop only in each single crochet across. Single crochet in 1st chain of corner. Chain 2 to create corner**. Repeat from * to ** twice more, single crochet in next chain. Slip stich to 1st single crochet to join.

Single crochet into the chain in the corners

Two rounds of border complete

Repeat round 2 for as many rounds as you like. Just make sure you do the same number of border rounds on the front and back so your stitch count will match up when you get to the step of joining the front and back together. Depending on the project I'll usually work 3-5 border rounds.

Turn project over so front side is facing you.

Repeat border rounds from the back side working into the slip stitches on the front side of your blanket. Do not fasten off after the last round.


Work into the slip stitches at the front of the project

Take your yarn ends in pairs and knot with a simple overhand knot. You can then trim your ends fairly short - to about 1-2 inches long. Note: Knotting the ends in pairs is completely optional since you've already fastened off each row. It just provides an extra bit of security so you know the ends won't unravel with use.  

Making sure all ends are tucked between border layers, hold both border layers together and join with a round of single crochet through both border layers.


Completed 3 rounds of border and layers joined with a round of single crochet


Friday, September 9, 2022

Overlay Mosaic Crochet Practice Graph - Square In Square

Practice graph - square in square


Here is another practice graph for Overlay Mosaic Crochet. This is a good size to practice the technique as well as making a small gauge swatch. It also makes a great coaster!

You can use any yarn you like with an appropriate crochet hook for the yarn. The sample shown was crocheted with Red Heart Super Saver yarn in White for color A and Grey Heather for color B with a size H/5mm hook. I get a gauge of 14 stitches x 14 rows = 4" in pattern with this hook and yarn.

As a reminder, border stitches are single crochet stitches worked into both loops. Except for the border stitches, all single crochet stitches are worked into the back loop only of the stitch in the previous row. All double crochet stitches are worked into the front loop only of the stitch two rows below. Fasten off at the end of each row.

Practice graph - square in square by Kari's Crafts

Written Instructions:

Row 0 (foundation row): Make 17 foundation sc or chain 18, sc in 2nd chain from hook and in each chain across (17 sc)

Row 1 (color A): sc, 15 scblo, sc

Row 2 (color B): sc, 15 scblo, sc

Row 3 (color A): sc, 1 dcflo, 13 scblo, 1 dcflo, sc

Row 4 (color B): sc, 1 scblo, 13 dcflo, 1 scblo, sc

Row 5 (color A): sc, 1 dcflo, 13 scblo, 1 dcflo, sc

Row 6 (color B): sc, 1 scblo, 3 dcflo, 7 scblo, 3 dcflo, 1 scblo, sc

Row 7 (color A): sc, 1 dcflo, 3 scblo, 7 dcflo, 3 scblo, 1 dcflo, sc

Row 8 (color B): sc, 1 scblo, 3 dcflo, 7 scblo, 3 dcflo, 1 scblo, sc

Row 9 (color A): sc, 1 dcflo, 3 scblo, 3 dcflo, 1 scblo, 3 dcflo, 3 scblo, 1 dcflo, sc

Row 10 (color B): sc, 1 scblo, 3 dcflo, 7 scblo, 3 dcflo, 1 scblo, sc

Row 11 (color A): sc, 1 dcflo, 3 scblo, 7 dcflo, 3 scblo, 1 dcflo, sc

Row 12 (color B): sc, 1 scblo, 3 dcflo, 7 scblo, 3 dcflo, 1 scblo, sc

Row 13 (color A): sc, 1 dcflo, 13 scblo, 1 dcflo, sc

Row 14 (color B): sc, 1 scblo, 13 dcflo, 1 scblo, sc

Row 15 (color A): sc, 1 dcflo, 13 scblo, 1 dcflo, sc


Thursday, September 8, 2022

Helpful Tip of the Day: Mosaic Crochet

 It's always nice when we find some simple tip that will make our lives easier. One issue when working in overlay mosaic crochet is the loop pulling up as you work your double crochet stitch into the front loop two rows below. This ends up creating a gap that you don't necessarily want. The good news is there's a very simple way to avoid this.

When working your double crochet into the front loop of the stitch two rows below gently hold on to the bottom of the double crochet stitch with your thumb as you work it. This will keep the loop anchored in place so it doesn't pull up as you work. 

Hold on to the bottom of the double crochet stitch to avoid the loop pulling up and creating a gap


Monday, September 5, 2022

Overlay Mosaic Crochet Practice Graph - Spiral Square

Overlay Mosaic Crochet practice graph - spiral square

I thought it would be helpful to offer a few practice graphs, especially for those that are new to overlay mosaic crochet. These are also good for making small gauge swatches to test your tension before starting a larger project. You can always use them for coasters or mug rugs when you're done. :) 

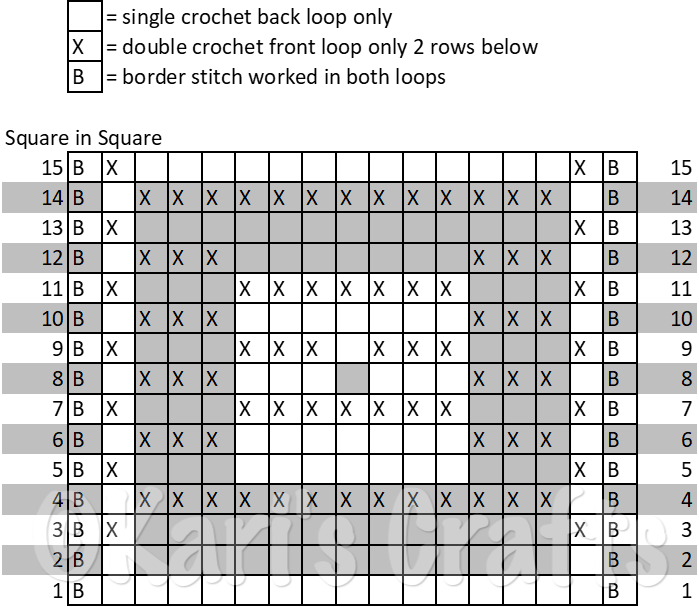
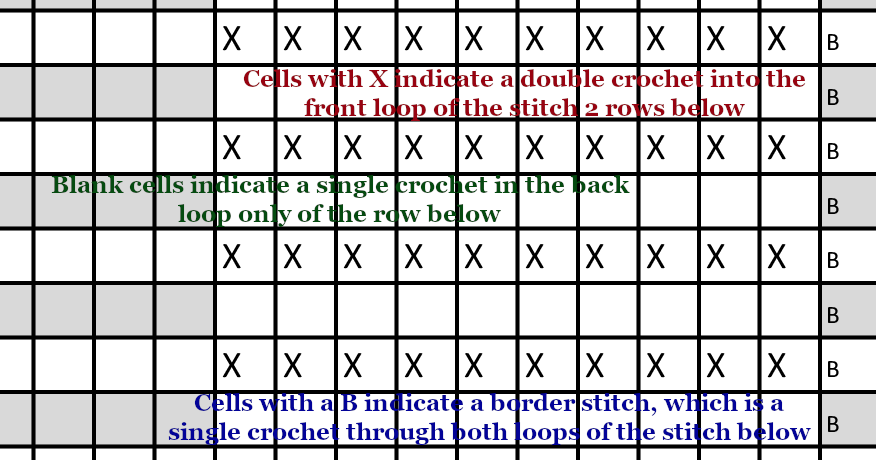
So we'll start with a spiral square. You can use whatever yarn you like with an appropriate hook for the yarn. The sample shown was made with Red Heart Super Saver in white for color A and Grey Heather for color B with a size H/5mm hook. There is one border stitch on each side. These are just single crochet stitches worked into both loops of the stitch in the previous row. I start each row with a standing single crochet, but if you prefer you can attach the yarn with a slip stitch, chain 1 and single crochet into the same stitch. Remember, except for the border stitches, all single crochets are worked into the back loop only of the stitch in the previous row. All double crochets are worked into the front loop only of the stitch 2 rows below. Fasten off at the end of each row.

spiral square practice graph by Kari's Crafts

Written Instructions:

Row 0 (foundation row): Make 17 foundation sc or chain 18, sc in 2nd chain from hook and in each remaining chain across. Fasten off. (17 sc)

Row 1 (color A): SC, 15 scblo, SC

Row 2 (color B): SC, 15 scblo, SC

Row 3 (color A): SC, 1 dcflo, 13 scblo, 1 dcflo, SC

Row 4 (color B): SC, 1 scblo, 1 dcflo, 13 scblo, SC

Row 5 (color A): SC, 1 dcflo, 1 scblo, 1 dcflo, 11 scblo, 1 dcflo, SC

Row 6 (color B): SC, 1 scblo, 1 dcflo, 1 scblo, 1 dcflo, 9 scflo, 1 dcflo, 1 scblo, SC

Row 7 (color A): SC, 1 dcflo, 1 scblo, 1 dcflo, 1 scblo, 1 dcflo, 7 scblo, 1 dcflo, 1 scblo, 1 dcflo, SC

Row 8 (color B): SC, 1 scblo, 1 dcflo, 1 scblo, 1 dcflo, 1 scblo, 1 dcflo, 5 scblo, 1 dcflo, 1 scblo, 1 dcflo, 1 scblo, SC

Row 9 (color A): SC, 1 dcflo, 1 scblo, 1 dcflo, 1 scblo, 1 dcflo, 1 scblo, 1 dcflo, 3 scblo, 1 dcflo, 1 scblo, 1 dcflo, 1 scblo, 1 dcflo, SC

Row 10 (color B): SC, 1 scblo, 1 dcflo, 1 scblo, 1 dcflo, 1 scblo, 1 dcflo, 3 scblo, 1 dcflo, 1 scblo, 1 dcflo, 1 scblo, 1 dcflo, 1 scblo, SC

Row 11 (color A): SC, 1 dcflo, 1 scblo, 1 dcflo, 1 scblo, 1 dcflo, 5 scblo, 1 dcflo, 1 scblo, 1 dcflo, 1 scblo, 1 dcflo, SC

Row 12 (color B): SC, 1 scblo, 1 dcflo, 1 scblo, 1 dcflo, 7 scblo, 1 dcflo, 1 scblo, 1 dcflo, 1 scblo, SC

Row 13 (color A): SC, 1 dcflo, 1 scblo, 1 dcflo, 9 scblo, 1 dcflo, 1 scblo, 1 dcflo, SC

Row 14 (color B): SC, 1 scblo, 1 dcflo, 11 scblo, 1 dcflo, 1 scblo, SC

Row 15 (color A): SC, 1 dcflo, 13 scblo, 1 dcflo, SC

More practice graphs and instructions on envelope border aka double border coming soon!


Friday, September 2, 2022

How To Read An Overlay Mosaic Chart or Graph

How to read an overlay mosaic chart or graph

 Each pattern designer writes their charts a little differently, but most follow these basic concepts. You'll always want to read the designer's notes and stitch definitions. These will normally define what each of the symbols and/or colors on the chart mean and how to work them.

example mosaic crochet chart
Here is an example of part of a mosaic crochet chart. Some designers mark them differently, but generally an X in a cell, whether or not it's shaded, means you will work a double crochet into the front loop of the stitch two rows below in the row color. You'll be skipping the stitch from the previous row, which ends up covering up the stitch in the previous row.
Double crochet into the front loop only of the stitch two rows below

Generally if a cell is blank in the chart, regardless of whether or not it's shaded, you'll work a single crochet into the back loop only of the stitch in the previous row, working in the current row color.
Single crochet into the back loop only of the stitch in the previous row
You'll be working one color at a time. The cells with the row numbers will usually be shaded for color A or B. Work the entire row with that color. Some cells in the chart in a particular row may be shaded a  different color, but that's only to show what the pattern looks like.

Some charts will have a B to indicate the border single crochet stitches, some will have SC, and some will have other markings. Again you'll need to look at the stitch definition for your current pattern. However it's indicated on the chart, you'll work a single crochet into both loops of the stitch in the previous row. 

These are the main symbols you'll encounter on an overlay mosaic crochet chart. In addition you may see indications for a chain stitch. When I started mosaic crochet I worked my double border aka envelope border with a slip stitch as I had been taught. I've since found a different method of working the border that uses a border stitch and a chain instead, so you'll see an "o" on many of my graphs that will indicate a chain stitch on each side of the rows. I'll cover that more in-depth in the post about border methods.


Wednesday, August 31, 2022

Overlay Mosaic Crochet Basics

Overlay Mosaic Crochet Basics

There are 2 main types of mosaic crochet - overlay and inset. (Interlocking mesh aka interlocking filet crochet is similar, but will be covered in a later post.) 

Here are the basic concepts & rules for overlay mosaic crochet:

  • All rows are worked with the right side facing you.
  • With few exceptions, only one color is used at a time. You can add other colors within the rows, but that will be covered in another post when we get past the basics.
  • Fasten off the yarn at the end of each row.
  • Don't worry about all of the yarn ends. There are several options for dealing with them. You can make them into a fringe or add an envelope border aka double border. An envelope/double border worked at the end will conceal all of the ends within the border. You also don't need to leave long ends when working an envelope border since you won't be weaving them in. How to finish with a fringe and how to work an envelope border will be covered in a separate post.
  • Except for the foundation row and border stitches, all single crochet stitches are worked into the back loop only of the stitch from the previous row. 
    Single crochet stitch worked into the back loop only

  • All double crochet stitches are worked into the front loop only of the stitch two rows below. Tip: the double crochet stitches will be worked into the same color.
    Double crochet stitch worked into the front loop only of the stitch two rows below

  • Border stitches are single crochet stitches at each end of the project and are worked into both loops of the stitch from the previous row. Tip: start each row with a standing single crochet.
  • Be careful when you're working a double crochet into the front loop of the stitch two rows below that you don't pull that front loop up too far because it will create a weird gap. To avoid the gap, I hold the bottom of the stitch with my thumb while I work the stitch so it doesn't pull up.
  • This is completely optional, but many times I keep track of my rows with a row counter. I started this after I had been using a paper clip on the side of my printed pattern to keep track of which row I was on but the paper clip fell off. Oops!
    Use a row counter to keep track of your rows
That's the basics for now. Next post will be how to read a mosaic chart and then practice mosaic patterns. 

Thursday, May 26, 2022

I'm back!

 I'm back! OK, I haven't exactly left. I've still been active on Etsy, Facebook, and somewhat on Instagram, but I haven't posted here on the blog for quite a while. Oops. Anyway, that's about to change. 

I've been working on a variety of projects lately including several new graphghan patterns and some new mosaic crochet patterns. I also started making mosaic crochet versions of some of my most popular graphghan patterns.

So starting this next week I'll be posting on a regular basis with new patterns and possibly a few crochet-alongs. In the meantime, here's a preview of a beginner mosaic pattern that I've posted in my Facebook group. The pattern will be posted here soon.

Buffalo Plaid mosaic crochet blanket